I have a few questions for you…
- Do you love to cook?
- Do you love Instagramming or Snapchatting your food?
- Do people absolutely love your food and recipes?
- Does everyone tells you that you should start a food blog?
- Have you ever thought about starting your own food blog but didn’t know where to start?
- Ever wondered how to start a food blog and make money?
- Ever wondered how you can make a full time living food blogging about the craziest food topics, like Disney World food and snack subscription boxes?
If you answered at least one of those questions you very well might need to start your very own food blog.
And you’re in luck. Today is the big day!
By following these simple steps below, you’ll have a food blog up in running in under 20 minutes. Plus, you’ll learn some killer tips to make it the most optimized, valuable, and profitable food blog possible.
Ready? If so, let’s get to it!
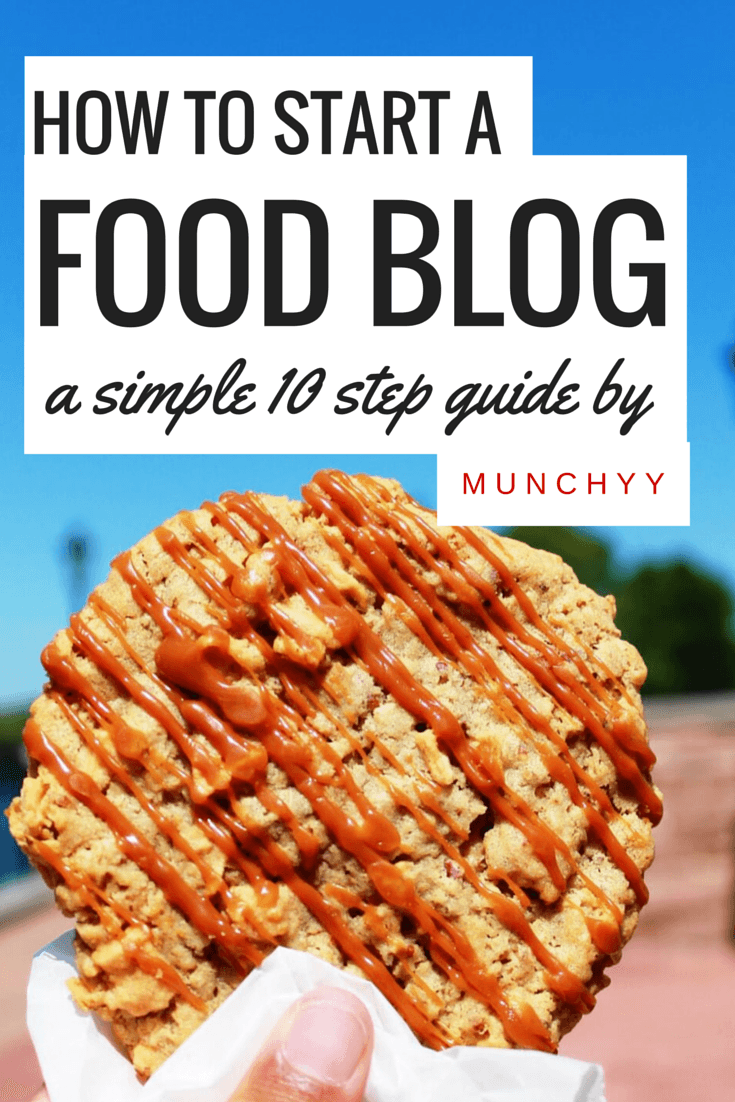
How to Start a Food Blog
Here’s an in-depth rundown on how to get your food blog up in running in a 20 minutes or less.
To get it up and running, you really only need to worry about steps 1-7.
Steps 8-10 are there to help you optimize and supercharge your food blog after you create it.
In this step-by-step guide, I recommend using Bluehost. It’s the easiest and cheapest hosting option and it’s highly recommend by WordPress as their premier hosting partner.
Hint: Just click on any step to be taken directly there.
- Naming your food blog and buy a matching domain name
- Choose the best web hosting plan
- Install WordPress
- Find and install the best WordPress theme
- Install essential WordPress plugins for site optimization
- Set up your Google Analytics, Webmaster Tools, and Adsense
- Write your first post!
- Set up your email subscribers list
- Monetize your food blog
- Supercharge your blog with additional tools and services
So let’s get started!
Disclaimer: Please note that some of the links below are affiliate links and I will earn a commission if you purchase through those links. I have personally used all of the products and services listed below and only recommend them because they are fantastic companies that I trust.
1. Choosing the Best Web Hosting Plan
Web hosting is basically like renting a space on the web to display your blog. This is how you’ll host your domain (see step 2).
There will be a lot of packages to choose from but since it’s your first food blog, I recommend going with the starter plan that Bluehost offers. It’s the cheapest plan available and offers everything you’ll ever need to get started including a free domain name!
Click here to get started with Bluehost for as low as $3.95 a month. Plus you’ll even get a free domain name!
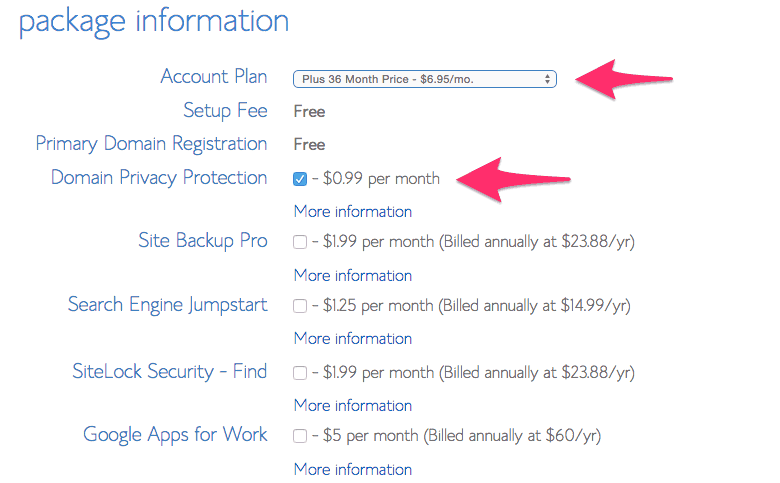
Plus, if you really want to save money, be sure to get the yearly plan. You’ll have to pay this up front, but it’s definitely worth the savings.
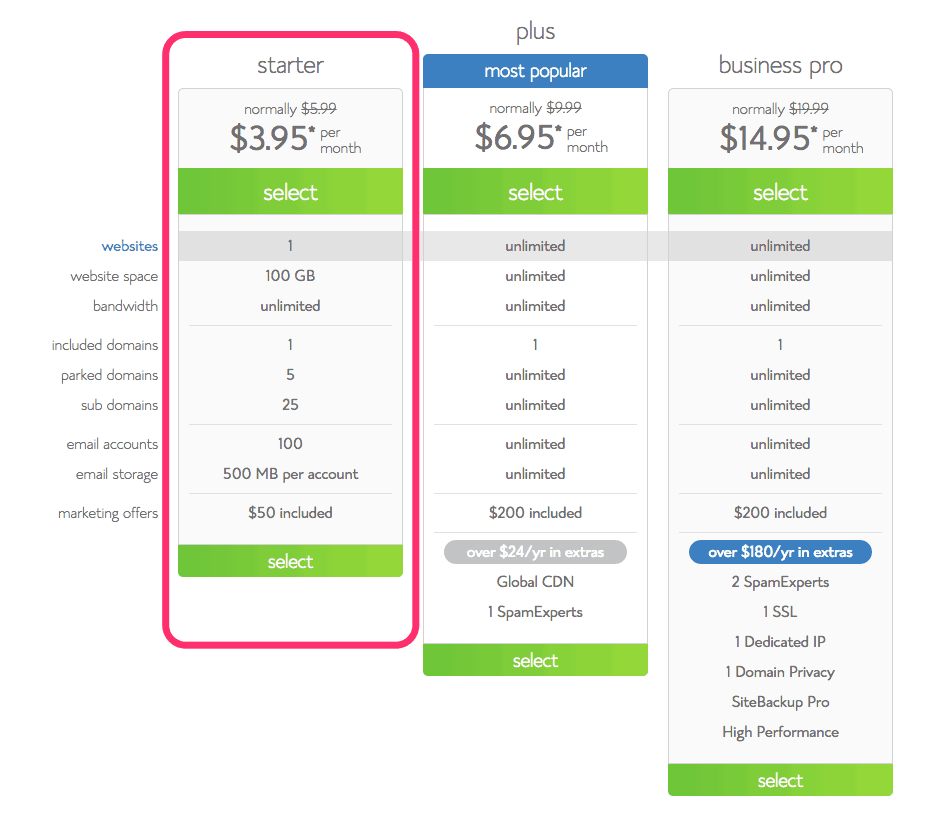
Choose you account plan term: I recommend going with the yearly plan since it’s cheaper.
Plus, as an added bonus, if you want to protect your personal address and keep it private from marketers and just members of the public, you should consider getting the ‘Domain Privacy Protection” add-on.
Then once you chose all the options you want, complete the sign up form.
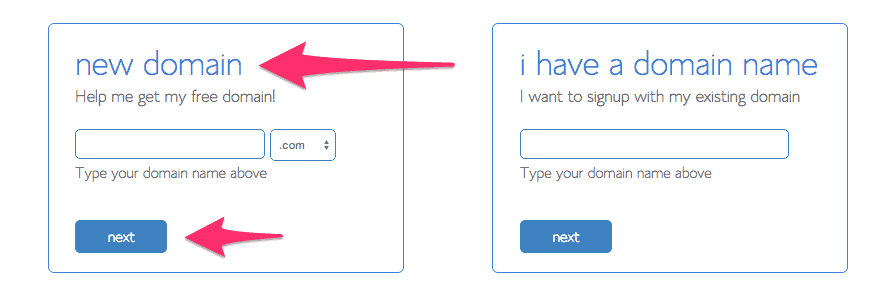
2. Naming Your Food Blog & Buying a Matching Domain Name
Now once you choose your web hosting plan, the next thing thing to do is choose your domain name.
This is hands down the best part of the entire process.
This is where you get to name your food blog and buy a matching domain name to go with it.
Choosing a name can be a long process so it’s important to brainstorm as many ideas as possible and write them down.
Once you you finally nailed the perfect name, it’s time to buy your name.
Check to see your domain name is available. If it is, purchase it before anyone else grabs it!
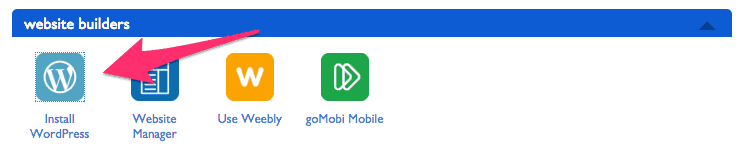
3. Installing WordPress
Once you finished the registration process with Bluehost, the next thing you’ll need to do is install WordPress.
WordPress is the most popular blogging software in the world and it’s the same one that I use here at Urban Tastebud. Plus, since WordPress is super easy to use and set up, it makes blogging 100x easier.
Here’s how you install WordPress:
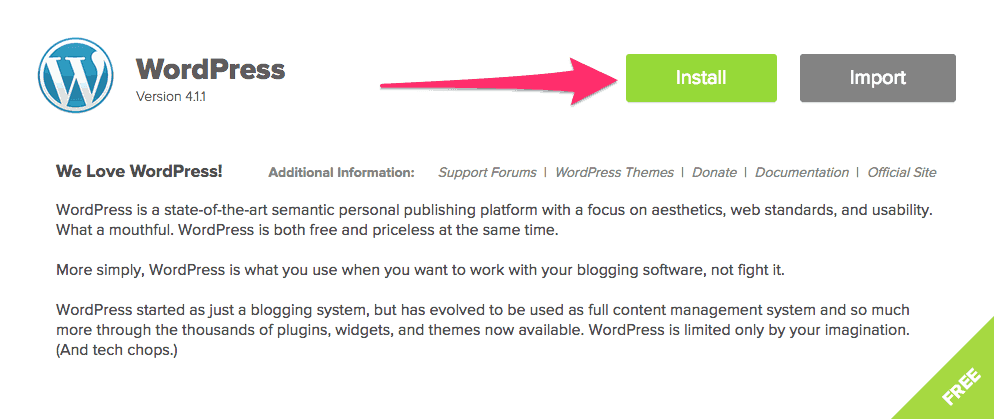
First, log in to Bluehost and find the “Website Builders” section and click on the “WordPress” icon.
On the next page, click on the “Install” button in the “Do it yourself (FREE)” section.
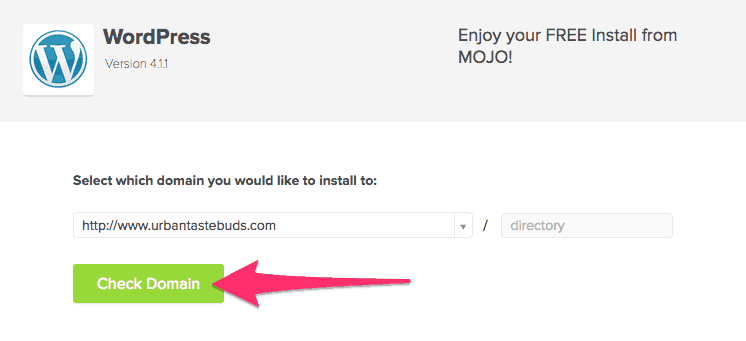
Find you domain name and then click on “Check Domain“
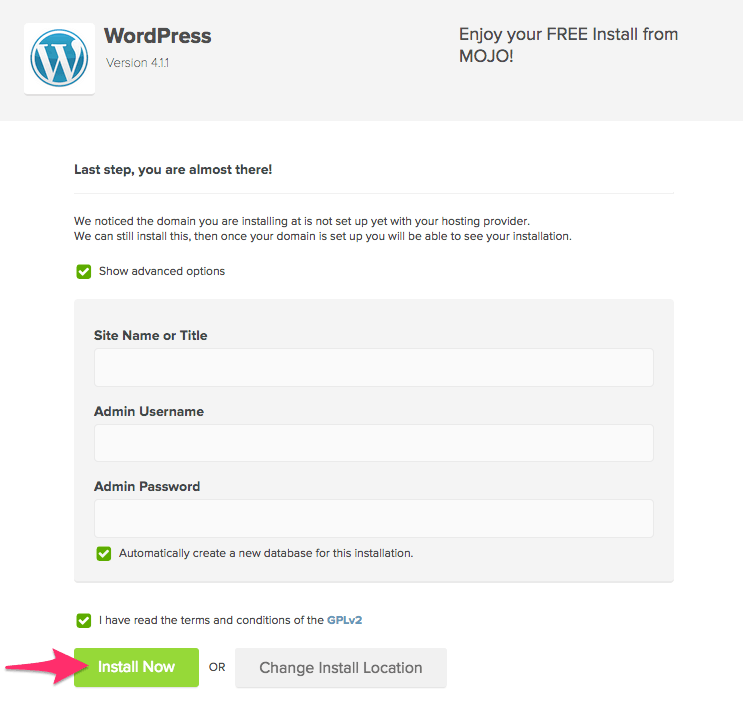
Once you check the domain, check both of these boxes: “Show advanced options” and “I have read the terms and conditions…“
Enter in the name of your blog as well as your desired username and password. These will be your login credentials. Then click on “Install Now“
Once you start the installation process, you’ll soon see “Your install is complete!” on the top. From here, click on “View Credentials.”

On this page, you’ll see your username and password as well as the URL where you can log in to your food blog. Be sure to write this down!

Click on your “Admin URL.” From here you’ll be taken to the login page. Enter in your username and password and then click “Log In“
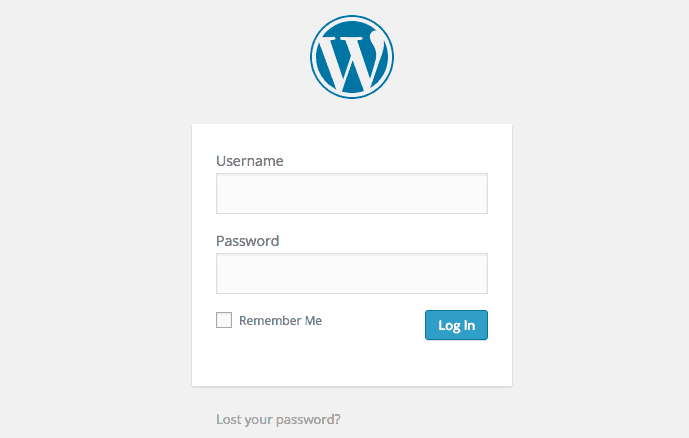
You just successfully created your first website!
4. Find and Install the Best WordPress Theme
Now that your new food blog is up and running, the next thing you need to do is find the perfect WordPress.
The best part about WordPress is that they offer a TON of free themes that you can choose form. But if this is something you really want to take seriously and perhaps turn it into a full time gig, I recommend going with a premium theme.
Here’s what you need to look for in a WordPress theme, premium or free:
- Responsive: Responsive themes are built to provide the optimal viewing experience for your readers when they are reading your blog from their computer, smartphone, or tablet. This basically means that your visitors won’t have to pinch and zoom just to read your blog posts.
- Clean: The last thing you want is a theme that filled with clutter, difficult to navigate, and complicated. If that’s the case, your visitors will immediately become frustrated and leave your site.
- Easy to Use: You need a theme that easy for you to use, especially when it comes to customizing. From changing the header logo to making tweaks in the color scheme, a blog that’s simple for your to use is very important.
- Backed by a fantastic support team: You may come in to problems with your theme that you can’t fix. That’s why it’s important to buy a theme that comes with a responsive support team or community forums so that you can quickly debug any issues that you may have with your site.
- Well designed: Design is king. So with that being said, be sure that your site is beautiful and professional. New visitors love coming to a website that’s aesthetically pleasing with lot’s of white space.
- Optimized for SEO: Using a theme that optimized for SEO (Search Engine Optimization), means that your blog posts will be easy to find on search engines like Google, Yahoo, Bing, etc. The higher your Google ranking, the more traffic your food blog is likely to have.
- Secure: The last thing you want is your food blog to be hacked. That’s why having a theme that has airtight security is extremely important.
Here Are My 2 Favorite Premium WordPress Themes:
1. Genesis Framework by Studiopress
This is the framework that I currently built this site on. Since speed, SEO, and mobile responsiveness are very important for your website, this framework is the perfect option.
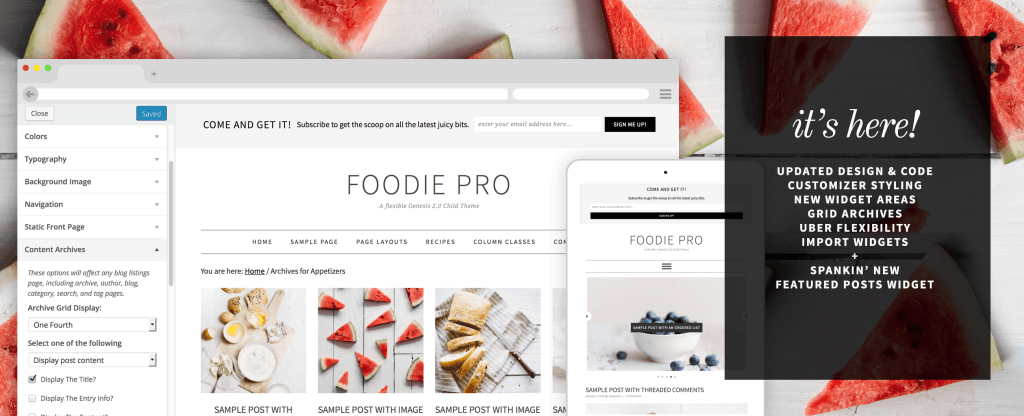
Currently, I use the News Pro Theme and I’ve never been happier. Most food blogs tend to use the Foodie Pro Theme which was designed specifically for food blogs.
Plus as an added bonus, the Foodie Pro Theme comes with a built-in recipe page template. Overall, Studiopress is highly recommended.
This was the first theme that I ever used in my food blogging career. Beautifully designed, easy to use, and affordable as compared to other premium themes out there.
There are a lot more out there but these are the two that I have personally used.
How to Design a User-Friendly Food Blog
Once you chose and installed your theme, the next thing you should focus on is making your food blog user-friendly.
Here are a few things your food blog’s readers should be able to do easily:
1. Leave a comment section
Make sure you don’t require your readers to use any of those CAPTCHA or login before leaving a comment. Chances are, they’ll just leave.
2. Share your epic blog posts with everyone
All your posts should have social sharing icons for Facebook, Twitter, Pinterest, Google+, Email, etc. that way your content can be shared easily, thus leading to more website traffic. You’ll learn more about the best social sharing plugin in the next section (Step #5).
3. Navigate your site quickly
Adding a menu bar allows your visitors to get to other parts of your site quickly.
4. Follow you on social media
Be sure to place prominent links to your Facebook page, RSS feed, and email subscription options on every single one of your pages so that readers have the option to follow everything that you publish.
Okay, now let’s move on to WordPress plugins.
5. Install Essential WordPress Plugins for Site Optimization
Here are some of the best plugins for food bloggers that I currently use or have used on this site.
These plugins provide certain services and features that may not already come with your WordPress Themes.
Plus, they can help simplify your blog or better, protect it from hackers, and increase website traffic. You can get the complete listing of the best plugins in our new top 20 listing.
But in the meantime, here are our essential plugins that you should install when you’re staring a food blog:
Make sure that your website and every single post and page you publish can be found on Google or any other search engine. This is the best plugin to help you maximize your websites SEO potential.
The last thing you’d want is a bunch of spam comments about cheap Louis Vuitton hand bags and Viagra flooding your blog. This plugin will stop this from happening.
An extremely potent plugin that will help speed up your website, as well as other fantastic options to help keep your site optimized. Speed is key.
This is one of the best comment management systems for WordPress that allows people to upvote and downvote comments. It’s truly a great way to communicate with your readers.
Since most people are already logged in to Facebook, this plugin allows them to leave comments quicker than normal, and better, even allows them to share their comment and your blog post on Facebook, helping you garner more exposure for your food website. I love this plugin.
This plugin makes recipe entry a breeze by allowing you to add recipes to your website with ease. Plus, it makes your recipes look pretty.
A simple but important plugin to increase the security on your blog. This plugin limits the number of times that someone can enter in an incorrect password before getting their IP address locked out for a certain amount of time. You’ll be shocked at how many times people will try to hack into your blog.
I’m not the biggest fan about post dating your blog posts. Whenever I see a post that’s from 2012, I sometimes discount the content before even reading it. That’s why I recommend removing the dates completely. This is more of a personal recommendation and won’t affect your site either way.
And last but not least, you MUST install SumoMe. From social sharing and email subscriber opt-in forms to heat maps and content analytics, this free plugin has everything you’ll ever need to help you grow your food blog’s traffic. If there’s one plugin you need to install, it’s this.
6. Set up your Google Analytics, Webmaster Tools, & Gmail
There’s no better way to track your website visitors, increase your SEO, and communicate with your readers and potential partners than with Google tools.
First, what you need to do is create a new gmail account. I recommend setting up a Google Apps for Business Gmail account. This means that your email will look like this – [email protected], while essentially working like a normal Gmail account.
It’s $5 a month but it’s totally worth it. Plus, if you ever wanted to change web hosts, you don’t have to worry about the hassle of moving your email accounts from one host to another. It’s sometimes a pain. You can sign up here (and get your first 30 days free).
Then once your Google account is up and running, start signing up for the additional tools below, which are free.
Google Analytics helps you track your food blog traffic. You can see where people are coming from, how long they’re on your site, and a lot more incredibly helpful statistics. It’s super helpful and will allow you to get a better understanding of who’s reading your content.
Google Webmaster Tools allows you to submit a sitemap to Google, see how many backlinks you have (and their sources), how many search engine impressions you get, and more.
7. Write your first post!
Okay, so you just finished the easy part of starting a food blog. Now it’s time to publish your first blog post!
Here’s a few things you should keep in mind when writing your first blog post:
- Be conversational: Write for people, not machines. Have a conversation with your readers. Ask them questions and try to find ways to relate to them. By being human, you’ll immediately gain your readers attention, and better, their trust.
- Write long posts: If ranking high on Google is one of your top priorities, writing long blog posts that are longer than 2,000 words is essential.
- Write listicles, best of, and how to type of content: These type content have a higher share-ability than most other types of posts. People love reading lists, and better, they love sharing them.
- Provide value: There’s nothing better than reading a post that provides immediate value to the reader. Whether if it’s providing actionable tips, inspiration, delicious recipes, or food for thought, readers are more likely to come back to your food blog, or better become a loyal subscriber.
- Write often: I know of many bloggers who write maybe once or twice a month, but if you really want to see a spike in your food website’s traffic, consider writing often. Once a week should do.
- If you build it, they won’t come: Just because you hit publish doesn’t mean you’ll get hundreds or thousands of readers to your site immediately. Just remember that you also need to get your content into the hands of the right people.
Next Level Food Blogging (Steps 8-10)
Hopefully you learned how to start a food blog from scratch and get it up and running in a matter of minutes.
Now it’s time to take your food blog to the next level.
Here are some resources that will help turn your food blog into a high traffic, highly profitable business. These are optional but still recommended, especially step 8.
8. Set up your email subscribers list
Building an audience on Facebook, Twitter, Instagram, Snapchat, etc is good and all but there’s one bad thing about it – it’s rented space.
One day Facebook can delete your Facebook Page, ban your Instagram account, or erase your Twitter existence.
That’s why it’s really important to build an email list because it’s the one thing that you own and have total control over.
Plus, with an email subscriber list, your follows can be notified of any new blog posts, updates, offers, and more.
Here are a few of my favorite email marketing services:
My new favorite and the one I currently use. It has the power of Infusionsoft but the ease of use of Mailchimp. I love it.
This is the first service that I used on Urban Tastebud and it’s a great service. It doesn’t have as many features as Aweber and it’s a little more pricey, but it’s really easy to set up and use. The one thing that separates Mailchimp from other services is the fact that your account is free up to 2,000 subscribers which is awesome.
This service is just like Mailchimp but offers a few more services and at a cheaper cost. I believe Aweber is easy to use when it comes to designing email templates as compared to Mailchimp.
These are the 2 email marketing services that I’ve personally used and you can’t go wrong either way. Mailchimp is great for starting up especially if you’re going the Lean Startup method, while Aweber is better suited for growth.
9. Monetize your food blog
Okay so making money many not be a top priority for some bloggers, but for me, it is.
There’s going to be a point where your food blog will get popular. And with popularity tends to come higher web hosting costs. Your food blog might literally get to the point where it’s too expensive to manage.
That’s why I recommend you monetize your blog. And the best part about it, it’s easy to do, and once you put the monetization methods in place, you’re all set.
Here are a few ways you can make money food blogging:
- Advertisement: Adding ads to your site via an advertising network is one of the simplest and quickest ways to monetize your food blog. The best one to use when you’re just starting out is Google Adsense. It’s easy to set up and they have a ton of ad sizes that you can choose from. With ads, you’ll make money whenever someone clicks on your add or whenever someone visits your site (aka an impression).
- Affiliate Programs: As a food blogger, there will be times when you recommend a certain product such as a cookbook, kitchen equipment, photography software and equipment, and even cameras and lenses. By joining an affiliate program, you’ll be able to make a small commission whenever someone buys a product you recommended through an affiliate link. I recommend getting started with ShareASale, CJ by Conversant, Linkshare, Pepperjam, and my personal favorite, Amazon Associates. But for promoting amazing products, I find ShareASale to be the easiest affiliate program to use when promoting food products especially, subscription boxes.
- Sponsorships: With sponsorships, companies and brands will pay you directly in return for an honest review, or recommendation of their products or services. Just remember, if you ever go this route, be sure to be authentic. Don’t make your sponsored blog posts seem like you’re only marketing the product and not providing any true value or insightful opinions. The best services to find sponsored opportunities are TapInfluence and Linquia.
- Sell products: One of the best way to make money food blogging is by selling your own products. Whether if it’s a cookbook, a food photography guide, meal plan templates, or even t-shirts and aprons, selling your own product allows you to control just how much money you want to make each month.
For the complete list on how to monetize your food blog, check out our in-depth resource of over 70+ ways to make money with your food blog which includes advertisement networks, affiliate programs, and other effect methods/techniques.
10. Supercharge your blog with additional tools and services
If you want to take your website to the next level in terms of speed, page load times, and security, here are a few services that I recommend buying:
The best way to keep your blog backed up and secure. With real time updates, one click restores, and security scans, you’ll be able to sleep a little better, knowing that your site is being taken care of.
Using a content delivery network like StackPath (formerly MaxCDN), your food blog will load faster and your images will instantly appear on the page. If you want to make your food blog faster, MaxCDN is exactly what you need.
Accidents happen. Make sure that your computer and more importantly, your files and document are always backed up. Get a 7.5% discount when you sign up for free with EBATES.
…
For more additional services and free tools, be sure to check out guide of 150+ deliciously awesome food blogger resources.
Final Thoughts and Recommendations

Now that you learned how to start a food blog from scratch, hopefully you’ll be ready to conquer the food blogging world.
I look forward to seeing your delicious recipes, mouthwatering photos, and beautiful food websites on the blogosphere.
Thank you so much for reading and good luck!
Cheers.